Skip to content
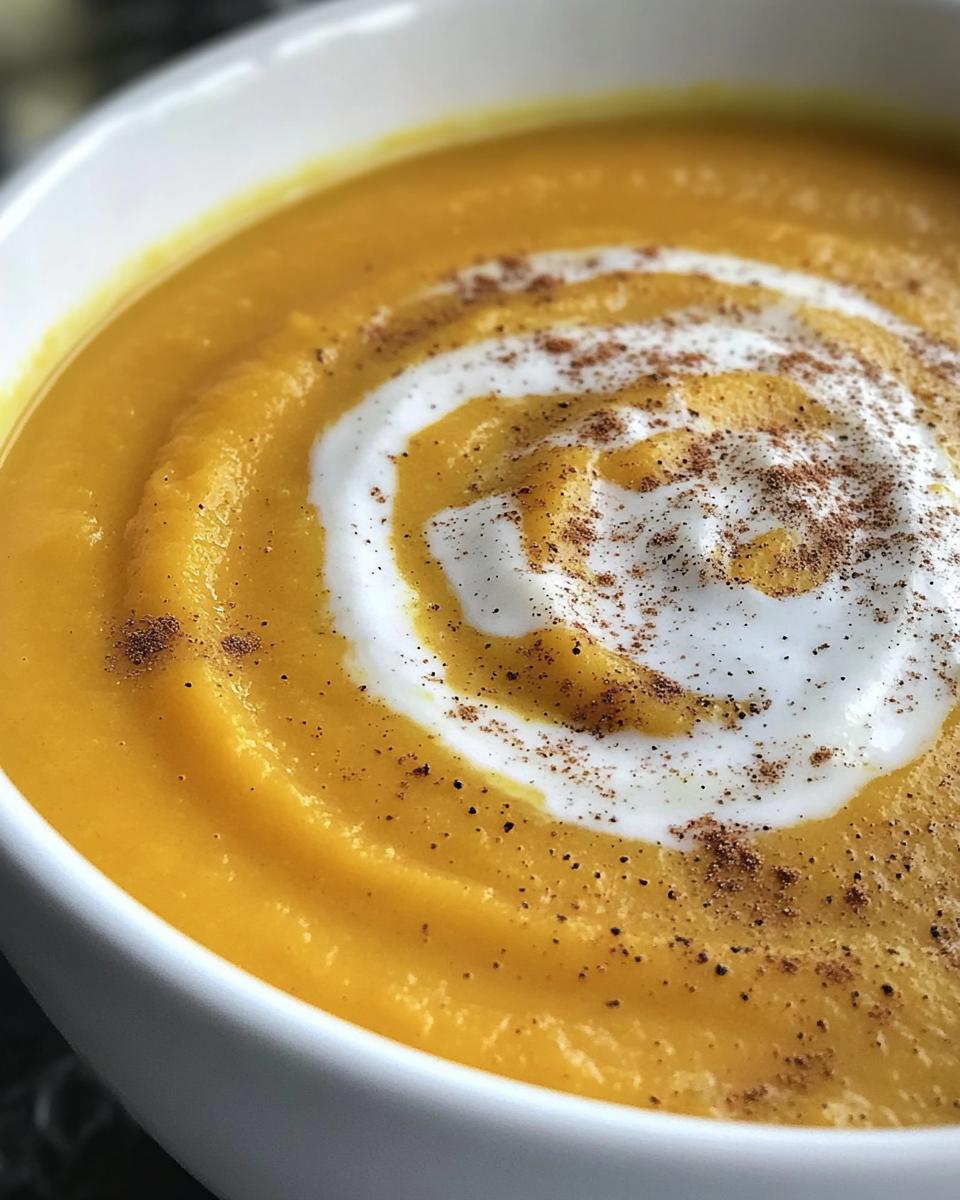
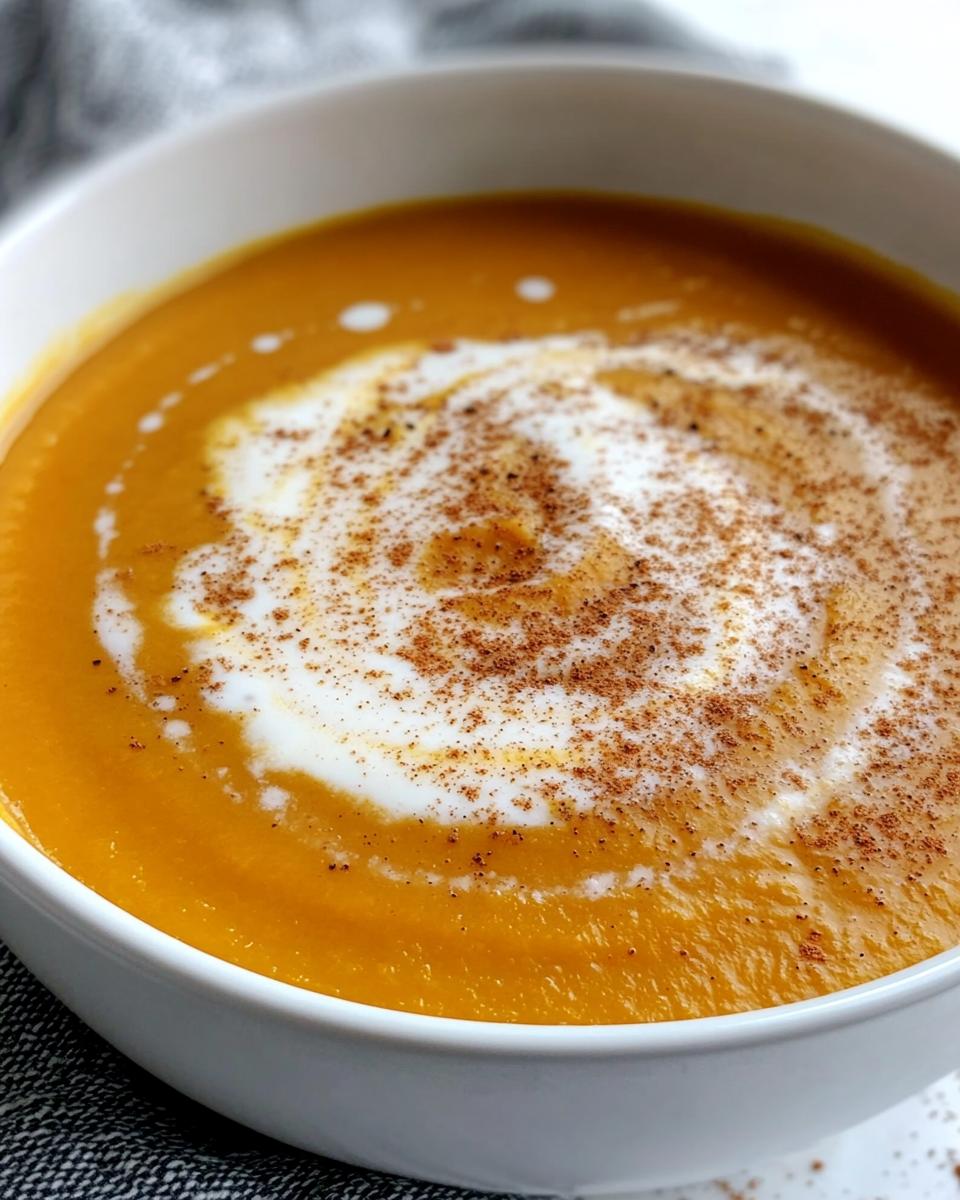
There’s nothing like a steaming bowl of winter squash soup when the temperature drops, but most recipes drown it in sugar or cream. That’s why I’m obsessed with my Stevia Winter Squash Soup No Sugar recipe – it’s all cozy comfort without the guilt! I discovered this trick when my doctor told me to cut back on refined sugars, and wow, does stevia work magic here. The natural sweetness from the squash pairs perfectly with just a hint of stevia, while cinnamon and nutmeg give it that classic winter spice kick. Best part? It’s packed with vitamin A and fiber from the squash, making it as nutritious as it is delicious. Trust me, after one spoonful of this velvety soup, you won’t miss the sugar one bit!
Why You’ll Love This Stevia Winter Squash Soup
This soup has become my wintertime obsession for so many reasons:
- Completely sugar-free – stevia gives just the right touch of sweetness without any blood sugar spikes
- Plant-powered goodness – 100% vegan and packed with nutrients from the squash
- Weeknight easy – ready in under an hour with simple ingredients
- Cozy in a bowl – warm spices make it perfect for chilly evenings
- Surprisingly creamy – no dairy needed for that velvety texture!
Honestly, I make a big batch every Sunday – it’s that good and that good for you!
Ingredients for Stevia Winter Squash Soup
Grab these simple ingredients – you probably have most in your kitchen already! The magic happens when these humble components come together.
- 1 medium winter squash (about 2 lbs) – peeled, seeded, and cut into 1-inch cubes (butternut or kabocha work beautifully)
- 1 tbsp olive oil – my go-to for that perfect sauté
- 1 small onion – chopped small so it melts right into the soup
- 2 cloves garlic – minced fine (because who wants a big chunk of raw garlic?)
- 4 cups vegetable broth – homemade if you’ve got it, or use low-sodium store-bought
- 1 tsp stevia powder – the pure kind without fillers
- 1/2 tsp ground cinnamon – the secret warmth-maker
- 1/4 tsp ground nutmeg – just enough to whisper “holiday spice”
- Salt and pepper – to taste, of course!
Ingredient Notes & Substitutions
Here’s the scoop on making this soup work with what you’ve got:
About that stevia: I know some folks find it tricky – too much can taste bitter. That’s why we’re using just a teaspoon to enhance the squash’s natural sweetness. If you’re new to stevia, start with 1/2 tsp and add more after blending. Prefer monk fruit? Swap it 1:1!
The squash situation: Butternut is my first love here (easy to peel!), but kabocha or even sweet dumpling squash work great. Avoid pumpkin – it’s too watery. Pro tip: look for squash that feels heavy for its size – that means it’s nice and dense.
Broth basics: I swear by homemade veggie broth, but store-bought works in a pinch. Just watch the salt if you’re using regular instead of low-sodium. Chicken broth works too if you’re not strictly vegan.
Oil options: Olive oil adds lovely flavor, but coconut oil gives a subtle sweetness if that’s your jam. Butter works too (though not vegan) – just don’t tell my dairy-free friends!
How to Make Stevia Winter Squash Soup
Okay, let’s get cooking! This soup comes together so easily, but I’ll walk you through each step to make sure it turns out perfect every time. I’ve made this so often I could probably do it in my sleep now!
- Heat the oil in your favorite soup pot over medium heat. I use my trusty Dutch oven – that heavy bottom prevents any scorching.
- Sauté the aromatics by adding your chopped onion first. Let it get translucent (about 3 minutes), then toss in the garlic for just 30 seconds – you’ll know it’s ready when your whole kitchen smells amazing.
- Add the squash and give everything a good stir. Let it cook for about 5 minutes – this quick roast deepens the flavor so much!
- Pour in the broth and bring it to a lively boil. Then immediately reduce to a gentle simmer (that happy medium where you see occasional bubbles breaking the surface).
- Cover and simmer for 20 minutes. Set a timer! You’ll know the squash is ready when a fork slides in effortlessly.
- Blend it smooth using an immersion blender right in the pot. No immersion blender? Carefully transfer to a regular blender in batches (hot liquids expand!).
- Season to perfection by stirring in the stevia, cinnamon, nutmeg, salt, and pepper. Let it simmer for another 5 minutes to let all those flavors get cozy together.
Tips for Perfect Soup
After making this dozens of times, here are my can’t-live-without tips:
Blending magic: For ultra-silky texture, blend a little longer than you think you need to. I do about 2 minutes with my immersion blender – it makes all the difference!
Stevia savvy: Always taste after adding half the stevia first. Different brands vary in sweetness, and your squash’s natural sugars will affect it too.
Safety first: When using a regular blender, fill it only halfway with hot soup, hold the lid down with a towel, and start on low speed. Hot soup explosions are no joke!
Thickness tweak: Too thick? Add broth a splash at a time. Too thin? Simmer uncovered for extra 5-10 minutes to reduce.
Flavor booster: Stir in a teaspoon of apple cider vinegar at the end if the flavors taste flat – it’s like magic fairy dust for soups!
Serving Suggestions for Stevia Winter Squash Soup
Oh, the possibilities! This soup shines brightest with simple pairings that let its sweet-spicy flavors take center stage. My absolute favorite? A thick slice of crusty whole grain bread for dipping – the contrast of textures is heavenly. For lighter meals, toss together a crisp apple-walnut salad with tangy vinaigrette. Cold winter evenings beg for cozy combos though – try it alongside grilled cheese (I’m partial to sharp cheddar on sourdough) or roasted Brussels sprouts. Honestly, it’s so satisfying it stands alone beautifully too – just add extra black pepper!
Storing and Reheating
Here’s the beautiful thing about this Stevia Winter Squash Soup – it actually gets better after sitting in the fridge overnight as the flavors meld together! I always make extra because it reheats like a dream. Just pop it in an airtight container (I’m obsessed with my glass mason jars for this) and it’ll keep beautifully for up to 3 days.
When you’re ready for round two, reheat gently on the stovetop over low heat, stirring occasionally. If it seems too thick after chilling, just whisk in a splash of broth or water to loosen it up. Microwave works too – just use 50% power in 1-minute bursts, stirring between each. Pro tip: if you see any separation (totally normal!), give it a quick blend with a whisk or immersion blender to bring back that velvety texture.
Want to freeze it? You absolutely can! Let the soup cool completely, then portion into freezer-safe containers (leave about an inch of space at the top for expansion). It’ll keep for up to 2 months. Thaw overnight in the fridge before reheating – and don’t be surprised if you need to add a little extra liquid after freezing, as squashes tend to thicken up when frozen.
Nutritional Information
Let’s talk about what makes this Stevia Winter Squash Soup such a nutritional powerhouse! Now, I’m no dietitian, but I’ve done my homework on these numbers. Just remember – these values are estimates and might change slightly depending on your exact ingredients (especially the size of your squash).
Per generous 1-cup serving, you’re looking at:
- 120 calories – light enough for a snack but satisfying enough for a meal
- 5g natural sugars (all from the squash!) – no added refined sugars here
- 4g filling fiber – thanks to our winter squash superstar
- 2g plant-based protein – not bad for a veggie soup!
- 300mg sodium – use low-sodium broth if you’re watching this
The real win? You’re getting over 100% of your daily vitamin A in every bowl from that gorgeous orange squash. Plus all the good stuff like potassium and vitamin C. I call that a delicious way to stay healthy through winter!
Dietary notes: Naturally vegan, gluten-free, dairy-free, and of course sugar-free. This soup checks all the boxes for just about any eating style.
Common Questions About Stevia Winter Squash Soup
I’ve gotten so many questions about this soup since I started making it – here are the ones that pop up most often!
Can I use a different sweetener besides stevia?
Absolutely! While I love stevia for being zero-calorie, monk fruit works just as well – use the same amount. If you’re okay with some natural sugars, a tablespoon of maple syrup or honey adds lovely depth (though it won’t be sugar-free anymore).
What’s the best squash for this soup?
Hands down, butternut is my top pick – sweet, easy to peel, and always available. Kabocha squash makes an amazing creamy alternative if you can find it. Avoid pumpkin (too watery) and spaghetti squash (wrong texture). Pro tip: acorn squash works in a pinch, but you’ll need to adjust stevia since it’s less sweet.
Why does my soup taste bitter?
Oh no! Two likely culprits: either you added too much stevia (start with half the amount next time), or your squash wasn’t ripe. Always pick squash that feels heavy for its size with dull, not shiny, skin. A pinch of salt and squeeze of lemon can help rescue bitter soup!
Can I make this soup ahead for meal prep?
You’re speaking my language! This soup gets better after 24 hours in the fridge as flavors meld. It keeps beautifully for 3 days refrigerated or 2 months frozen. Just remember – it thickens when cold, so you’ll need to thin it with broth when reheating.
My soup is too thin/thick – help!
No worries – soup rescues are my specialty! Too thin? Simmer uncovered for 5-10 minutes to reduce. Too thick? Whisk in warm broth a splash at a time. Remember – it thickens as it cools, so err on the thinner side when first making it.
Share Your Thoughts
Alright, soup lovers – I’ve poured my heart (and a whole lot of squash) into this recipe, and now I want to hear from you! Did your Stevia Winter Squash Soup turn out silky smooth? Maybe you added your own twist with a dash of cayenne or swapped in coconut milk? Drop me a comment below – I read every single one!
Nothing makes me happier than seeing your kitchen successes (or even the funny flops – we’ve all been there!). Did your kids actually eat their veggies without noticing? Did this become your new go-to meal prep? Tell me everything! Your tips might just help another home cook perfect their batch.
And hey, if you snapped a photo of that gorgeous orange goodness, tag me on Instagram – I’ll probably feature your masterpiece in my stories! Now get cozy with your soup and let’s chat in the comments. Happy blending, friends!
For more sugar-free inspiration, check out our Pinterest boards!
Print
Velvety Stevia Winter Squash Soup No Sugar in 30 Minutes
- Total Time: 45 mins
- Yield: 4 servings 1x
- Diet: Vegan
Description
A warm and comforting winter squash soup sweetened naturally with stevia, perfect for chilly days.
Ingredients
- 1 medium winter squash (about 2 lbs), peeled and cubed
- 1 tbsp olive oil
- 1 small onion, chopped
- 2 cloves garlic, minced
- 4 cups vegetable broth
- 1 tsp stevia powder
- 1/2 tsp ground cinnamon
- 1/4 tsp ground nutmeg
- Salt and pepper to taste
Instructions
- Heat olive oil in a large pot over medium heat.
- Add onion and garlic, sauté until softened.
- Add cubed squash and cook for 5 minutes.
- Pour in vegetable broth and bring to a boil.
- Reduce heat, cover, and simmer for 20 minutes or until squash is tender.
- Blend the soup until smooth using an immersion blender.
- Stir in stevia, cinnamon, nutmeg, salt, and pepper.
- Simmer for another 5 minutes, then serve hot.
Notes
- Adjust stevia to taste if needed.
- For a creamier texture, add a splash of coconut milk.
- Store leftovers in an airtight container for up to 3 days.
- Prep Time: 15 mins
- Cook Time: 30 mins
- Category: Soup
- Method: Stovetop
- Cuisine: American
Nutrition
- Serving Size: 1 cup
- Calories: 120
- Sugar: 5g
- Sodium: 300mg
- Fat: 4g
- Saturated Fat: 0.5g
- Unsaturated Fat: 3g
- Trans Fat: 0g
- Carbohydrates: 20g
- Fiber: 4g
- Protein: 2g
- Cholesterol: 0mg