Skip to content
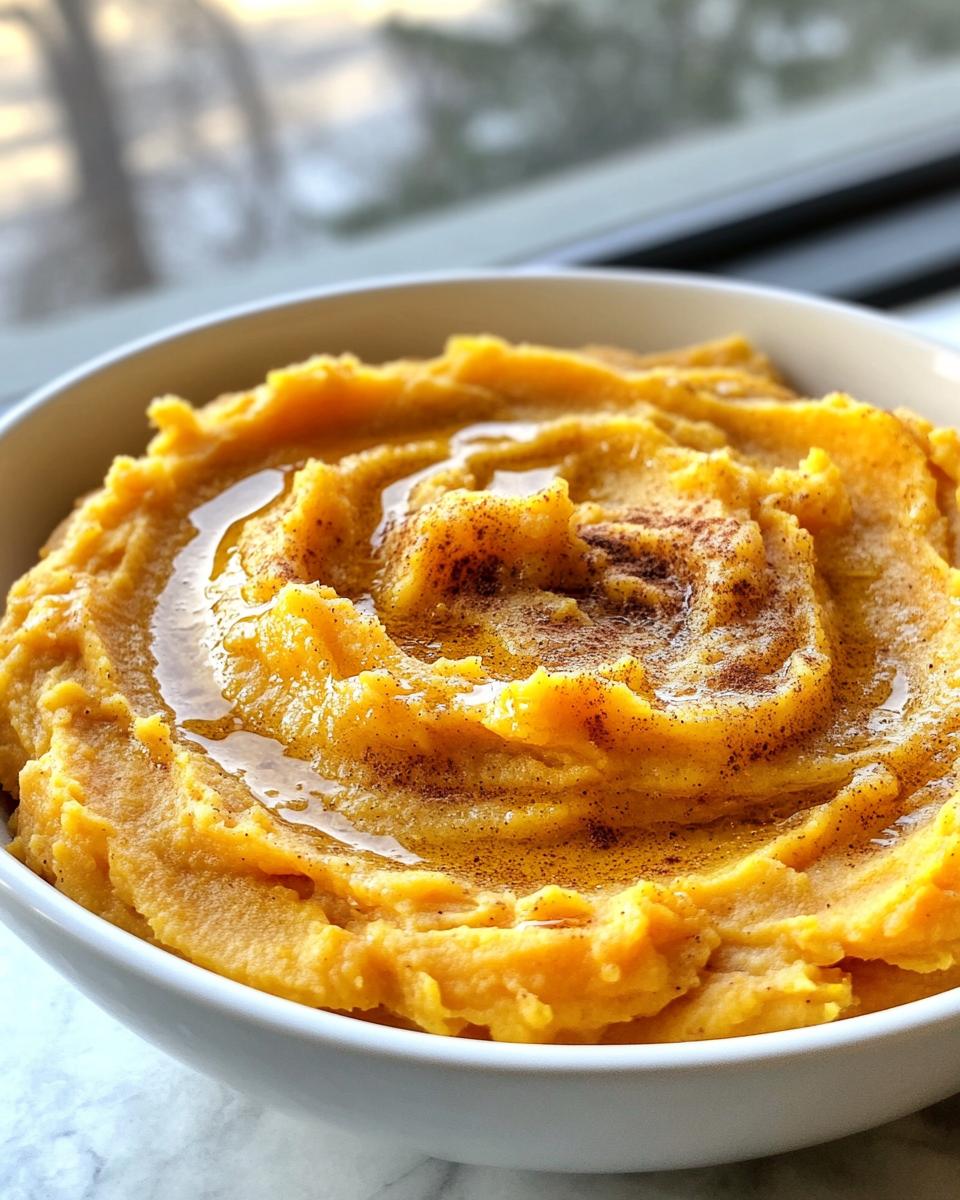
If you’ve ever wished for that rich, creamy sweetness of mashed sweet potatoes without the sugar crash afterwards, I’ve got you covered. This stevia sweet potato mash sugar free recipe has been my go-to side dish ever since my doctor suggested cutting back on refined sugars. Trust me when I say you won’t miss the brown sugar one bit – the natural sweetness of the potatoes combined with just the right amount of stevia creates magic in your mouth. My kids actually prefer this version now (and they don’t even realize it’s good for them). The secret? Choosing the right sweet potatoes and blending everything while they’re piping hot for that perfect velvety texture.

Ingredients for Stevia Sweet Potato Mash Sugar Free
Okay, let’s gather everything we need for this easy, sugar-free delight! I’ve made this so many times I could probably do it in my sleep, but trust me, measuring carefully makes all the difference here. Here’s what you’ll want to have ready:
- 2 large sweet potatoes (about 4 cups when peeled and cubed) – look for ones with deep orange flesh for maximum natural sweetness
- 1 tablespoon stevia powder – I use pure stevia extract, but start with ½ tablespoon if you’re new to it and adjust to taste
- 2 tablespoons unsalted butter – or vegan butter if you’re keeping it dairy-free (I’ve used Earth Balance with great results)
- ¼ cup unsweetened almond milk – any milk works really; coconut milk makes it extra creamy!
- ½ teaspoon cinnamon – because what’s sweet potatoes without that warm spice?
- ¼ teaspoon salt – just enough to make all the flavors pop
A quick note about the sweet potatoes – I’ve learned the hard way that size matters here. Those monster sweet potatoes that look like they could feed a family of four? Two of those will give you way more than 4 cups. When in doubt, grab medium-large ones that feel heavy for their size.
How to Make Stevia Sweet Potato Mash Sugar Free
Alright, let’s turn these humble ingredients into the creamiest, dreamiest mash you’ve ever tasted! I’ve made this recipe so many times I’ve got it down to a science, but don’t worry – it’s foolproof. Just follow these simple steps and you’ll have a bowl of golden goodness in no time.
Boiling and Draining Sweet Potatoes
First things first – get a large pot and fill it about halfway with water (enough to completely cover the potatoes). Bring it to a rolling boil while you’re peeling and cubing your sweet potatoes. I like to cut them into evenly-sized 1-inch chunks so they cook at the same rate.
Carefully drop those orange beauties into the boiling water and set your timer for 15 minutes. You’ll know they’re perfect when a fork slides in easily with no resistance, but they’re not falling apart. Drain them well – I usually give the colander a few good shakes to get rid of excess water. Too much moisture makes for a soggy mash, and we don’t want that!
Mashing and Seasoning
Now for the fun part! Return the drained potatoes to the warm pot (off the heat) and add your butter first – it melts beautifully on the hot potatoes. Grab your favorite mashing tool – I’m partial to an old-fashioned potato masher for that perfect texture, but a ricer works great too if you want it super smooth.
Here’s my pro tip: add the stevia a little at a time, tasting as you go. Stevia can vary in sweetness, so you might need more or less than the full tablespoon. Then drizzle in the almond milk gradually until you reach your ideal creaminess. Sprinkle in the cinnamon and salt, give it one final mix, and voilà – sugar-free sweet potato perfection!
Why You’ll Love This Stevia Sweet Potato Mash Sugar Free
Oh, where do I even begin? This recipe has become my kitchen MVP for so many reasons – let me count the ways you’re going to adore it:
- Diabetic-friendly sweetness – All the comfort of traditional mashed sweet potatoes without the blood sugar spike. My uncle with type 2 diabetes can finally enjoy his favorite side again!
- Naturally sweetened magic – The perfect balance of the potatoes’ inherent sweetness with just enough stevia to make it dessert-level delicious.
- Creamy dreamy texture – Silky smooth and rich without being heavy. I’ve converted butter-and-brown-sugar purists with one bite.
- Wholesome ingredients – Just real food with simple, pronounceable components. No weird sugar substitutes or artificial anything.
- Quick & easy prep – From peel to plate in 30 minutes flat, even on busy weeknights. My secret weapon when guests show up unexpectedly!
- Endlessly adaptable – Dress it up with pecans for holidays or keep it simple for everyday. Works with whatever milk or butter you’ve got on hand.
Honestly, the hardest part is resisting the urge to eat it straight from the pot with a spoon (not that I haven’t done that a time or two…). Once you try this version, you might never go back to sugar-laden sweet potatoes again!
Tips for Perfect Stevia Sweet Potato Mash Sugar Free
After making this recipe more times than I can count, I’ve learned all the little tricks to avoid common mistakes. Let me save you from the kitchen mishaps I’ve had so your stevia sweet potato mash turns out flawless every single time!
Getting the texture just right
The number one complaint I hear about mashed sweet potatoes? “Mine turned out gummy!” Here’s what I’ve figured out – don’t over-boil them. You want fork-tender, not falling-apart mushy. Test at 15 minutes, then every 2 minutes after if needed. And for heaven’s sake, drain them well! I let mine sit in the colander for a full minute while shaking occasionally – that extra water is the enemy of fluffy mash.
Your mashing tool makes a huge difference too. My grandma’s old potato masher gives that perfect rustic texture with just enough lumps. If you like it super smooth, a ricer is worth the investment – just don’t use a food processor unless you want sweet potato glue (learned that the hard way).
Balancing the sweetness
Stevia can be tricky if you’re not used to it – too much and you’ll get that weird aftertaste. I always start with half the amount, then taste and add more until it’s just right. The natural sweetness of the potatoes does a lot of the work here. Pro tip: if you accidentally overdo the stevia, a squeeze of fresh orange juice can help balance it out beautifully.
Timing matters too – I add the stevia while the potatoes are still piping hot. The heat helps distribute the sweetness evenly throughout the mash. Wait until it cools and you’ll get uneven sweet spots – not ideal!
Extra tricks from my kitchen
Want to take your mash to the next level? Try roasting a garlic clove with the potatoes (just wrap it in foil) and mixing it in – game changer! For special occasions, I’ll top it with toasted pecans or a sprinkle of smoked paprika for that wow factor.
And here’s my golden rule – always serve it warm. Sweet potato mash firms up as it cools, so if you’re making it ahead, keep it covered in the pot with the heat off and give it a quick stir with a splash of warm milk before serving. Your guests will never know it wasn’t freshly made!
Ingredient Substitutions for Stevia Sweet Potato Mash Sugar Free
Listen, I get it – sometimes you’re halfway through making this and realize you’re out of almond milk, or maybe you want to try a different twist. No worries! This recipe is incredibly forgiving, and I’ve tried just about every variation you can imagine. Here are my tried-and-true swaps that still give you amazing results:
Milk alternatives
That quarter cup of almond milk is totally flexible. Coconut milk (the canned kind) makes it extra rich and creamy – perfect for holiday dinners. Regular dairy milk works great if you’re not avoiding lactose. Even water in a pinch will do, though you might need an extra pat of butter to make up for the lost creaminess.
Sweetener options
While stevia keeps it sugar-free, I’ve used monk fruit blend with excellent results when I’ve run out. If you’re not strictly avoiding sugar, a tablespoon of pure maple syrup adds wonderful depth (just reduce the milk slightly). For a banana boost, mash in half a very ripe one – it adds natural sweetness and creaminess.
Butter substitutes
My vegan friends love this with Earth Balance or coconut oil instead of butter. Olive oil works in a pinch too, though you’ll lose some of that classic richness. For extra nutrition, I sometimes use half butter and half tahini – gives it a subtle nutty flavor that’s surprisingly delicious.
Spice variations
That half teaspoon of cinnamon is just the beginning! Pumpkin pie spice makes it taste like dessert. A pinch of cayenne adds a fun kick. For autumn vibes, try adding a quarter teaspoon each of nutmeg and allspice. My adventurous cousin even swears by a dash of espresso powder – says it enhances the sweetness.
The beauty of this recipe is how adaptable it is. My only hard rule? Always use fresh sweet potatoes – the canned ones just don’t mash right. Beyond that, feel free to play around until you find your perfect combination. That’s how all the best family recipes are born!
Serving Suggestions for Stevia Sweet Potato Mash Sugar Free
Now that you’ve made this glorious bowl of orange goodness, let’s talk about how to serve it! I’ve paired this mash with just about everything over the years, and here are my absolute favorite combinations that’ll make it shine:
- Classic roasted chicken – The crispy skin and juicy meat play perfectly with the sweet creaminess. Sunday dinner perfection!
- Maple-glazed salmon – That sweet-savory combo? Chef’s kiss. The omega-3s love the vitamin A in the potatoes.
- Grilled tofu or tempeh – My vegan friends go wild when I serve it with smoky marinated tofu. Protein power couple!
- Thanksgiving turkey – No surprise here, but it’s become a staple at our holiday table right next to the green beans.
- Pork chops with apples – That sweet-savory-pork trifecta is comfort food at its finest.
- Black bean burgers – Sounds weird but tastes amazing. The mash makes a killer burger topping too!
For breakfast lovers (yes, breakfast!), try it with scrambled eggs and avocado – sweet and creamy meets rich and savory. And don’t even get me started on how good it is with a runny yolk… Honestly, I’ve been known to eat it straight from the bowl with a spoon when no one’s looking. No judgment here!
Storing and Reheating Stevia Sweet Potato Mash Sugar Free
Okay, let’s talk leftovers – because let’s be real, you’ll probably have some (unless you’ve got my husband’s appetite). This mash keeps beautifully if you store it right, and I’ve got all the tricks to bring it back to life without losing that fresh-made creaminess.
Fridge storage
Pop any leftovers into an airtight container and they’ll stay good in the fridge for 4-5 days. I like to press a piece of plastic wrap directly onto the surface before sealing the lid – prevents that weird dried-out layer on top. The mash will firm up when chilled, but don’t worry, we’ll fix that when reheating!
Freezer magic
Yes, you can freeze this! Portion it into freezer bags (I do 1-cup servings) and squeeze out all the air. It’ll keep for 2-3 months. Thaw overnight in the fridge when you’re ready to use it. Pro tip: write the date on the bag – frozen sweet potato mash looks suspiciously like butternut squash soup after a while!
Reheating like a pro
Here’s where most people go wrong – microwaving it straight up turns it rubbery. My foolproof method? Stovetop with a splash of milk. Add the mash to a saucepan with a tablespoon or two of milk (any kind), cover, and heat on low, stirring occasionally. The steam brings it back to life beautifully. If it’s still too thick, add more milk a teaspoon at a time until it’s perfect.
For small portions, the microwave can work if you’re careful. Use 30-second bursts at 50% power, stirring between each, and add a few drops of milk each time. Cover with a damp paper towel to keep moisture in. Stop when it’s just warm enough – overheating kills the texture.
One last secret – if your reheated mash tastes a bit flat, a tiny pinch of fresh salt and cinnamon can wake up the flavors. I’ve served “day-old” mash that tasted better than the first batch with this trick!
Nutritional Information for Stevia Sweet Potato Mash Sugar Free
Let’s talk numbers – because I know how important it is to understand what’s going into your body (especially if you’re watching sugar or carbs). Here’s the breakdown per serving, though remember what my nutritionist friend always says: “Nutritional values are estimates and may vary based on ingredients used.” I’ve tested this with different brands and variations, so take this as your general guide:
- Serving Size: 1/2 cup (about 120g)
- Calories: 120 – way less than traditional sugar-loaded versions!
- Sugar: 5g (all natural from the sweet potatoes – no added sugars)
- Sodium: 150mg – easy on the salt shaker if you’re watching this
- Fat: 4g (2.5g saturated) – mostly from that glorious butter
- Carbohydrates: 20g – complex carbs that digest slowly
- Fiber: 3g – gut-friendly goodness
- Protein: 2g – not bad for a side dish!
- Vitamin A: A whopping 200% of your daily needs – hello, eye health!
Now here’s what really excites me – compared to traditional sweet potato casserole loaded with brown sugar and marshmallows, this version cuts the sugar by about 75% while keeping all that delicious flavor. My diabetic sister-in-law did the math and was thrilled she could enjoy a full serving without worrying about her blood sugar spiking.
One last note – these numbers assume you’re using all the ingredients exactly as written. Swap in coconut milk? That’ll change the fat content. Use less butter? Fewer calories. That’s the beauty of cooking from scratch – you’re in complete control of what goes into your body!
Frequently Asked Questions
Can I use frozen sweet potatoes for this mash?
Absolutely! I keep a bag of frozen cubed sweet potatoes in my freezer for emergencies. Just boil them straight from frozen – they’ll need about 5 extra minutes. The texture might be slightly softer, so go easy on the milk when mashing. Not quite as perfect as fresh, but still delicious when you’re in a pinch!
How do I reduce bitterness from stevia?
Ah, the stevia learning curve! Here’s my trick – always mix the stevia with a tiny bit of warm water first to dissolve it completely before adding. If it still tastes bitter, a squeeze of lemon juice or dash of vanilla extract balances it beautifully. And remember – sweet potatoes are naturally sweet already, so you might need less stevia than you think!
Can I make this ahead for Thanksgiving?
You bet! This is my Thanksgiving lifesaver. Make it up to 2 days ahead, store in the fridge, then reheat with extra butter and milk before serving. Actually tastes better as the flavors meld. For large batches, transfer to a slow cooker on “keep warm” – stir occasionally and add splashes of broth to maintain creaminess.
Why is my mash turning out watery?
Oh honey, I’ve been there! Usually means the potatoes were overcooked or not drained well enough. Next time, try steaming instead of boiling – keeps more flavor in the potatoes and less water in the mash. If it’s already too wet, return it to a low heat and stir constantly to evaporate excess moisture. A sprinkle of potato flakes can help in emergencies!
Can I use this for baby food?
It’s perfect! I’ve fed this to all three of my kids as their first “real food.” Just omit the salt and cinnamon for babies under 1 year, and make sure it’s super smooth (I use an immersion blender for baby versions). The natural sweetness makes it a hit, and you’re introducing veggies without any sugar – parenting win!

30-Minute Sugar-Free Stevia Sweet Potato Mash Perfection
- Total Time: 30 minutes
- Yield: 4 servings 1x
- Diet: Diabetic
Description
A sweet and creamy mashed sweet potato dish without added sugar, sweetened naturally with stevia.
Ingredients
- 2 large sweet potatoes, peeled and cubed
- 1 tablespoon stevia powder
- 2 tablespoons unsalted butter or vegan butter
- 1/4 cup unsweetened almond milk
- 1/2 teaspoon cinnamon
- 1/4 teaspoon salt
Instructions
- Boil sweet potatoes in water until tender, about 15-20 minutes.
- Drain water and return sweet potatoes to the pot.
- Add stevia, butter, almond milk, cinnamon, and salt.
- Mash until smooth and creamy.
- Adjust seasoning to taste and serve warm.
Notes
- Use fresh sweet potatoes for best texture.
- Adjust stevia to your preferred sweetness.
- Replace almond milk with any dairy-free or regular milk.
- Prep Time: 10 minutes
- Cook Time: 20 minutes
- Category: Side Dish
- Method: Boiling, Mashing
- Cuisine: American
Nutrition
- Serving Size: 1/2 cup
- Calories: 120
- Sugar: 5g
- Sodium: 150mg
- Fat: 4g
- Saturated Fat: 2.5g
- Unsaturated Fat: 1g
- Trans Fat: 0g
- Carbohydrates: 20g
- Fiber: 3g
- Protein: 2g
- Cholesterol: 10mg