Skip to content
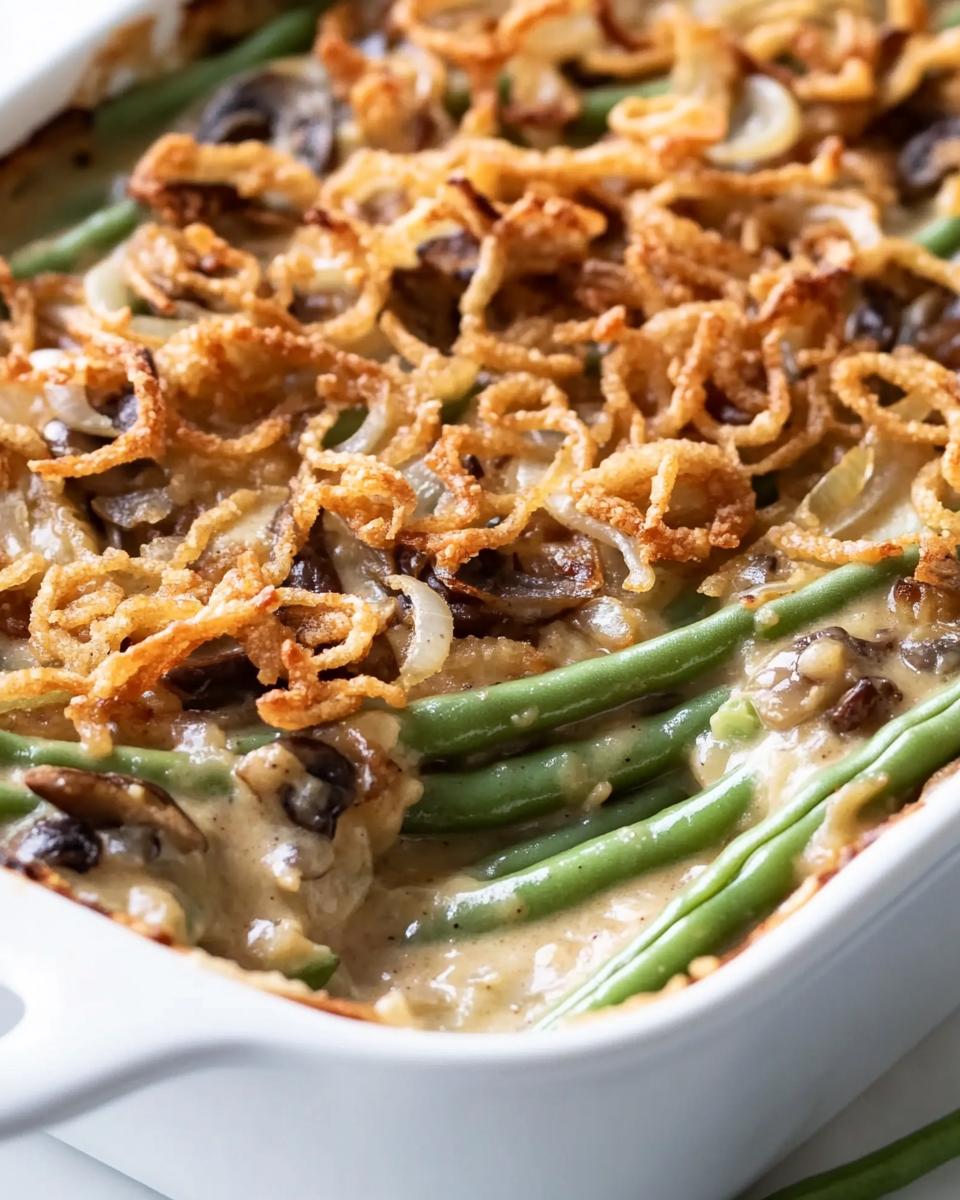
Every family gathering needs that one dish everyone secretly fights over – and in our house, it’s this Stevia Green Bean Casserole No Sugar recipe that changed the game. When my doctor told me to cut back on sugar, I thought holiday sides were doomed to be boring. Then I discovered how stevia works magic in savory dishes! This version keeps all the creamy, comforting goodness of the classic casserole without any sugar crash afterwards. The crispy onions still give that satisfying crunch, and nobody will guess it’s diabetic-friendly unless you tell them. Trust me, it’s become my most-requested recipe since I started making it for Thanksgiving three years ago.
Why You’ll Love This Stevia Green Bean Casserole No Sugar
This isn’t just another side dish – it’s a game-changer for anyone watching their sugar intake without sacrificing flavor. Here’s why it’s become my go-to recipe:
- No sugar crash: Stevia gives just the right touch of sweetness without spiking blood sugar
- Diabetic-friendly: Perfect for holiday tables where dietary needs vary
- Ready in 40 minutes – faster than most traditional casseroles
- Rich, creamy sauce that fools everyone into thinking it’s the full-sugar version
- Crispy onions still deliver that nostalgic crunch we all crave
The best part? You won’t miss the sugar one bit – I promise!
Ingredients for Stevia Green Bean Casserole No Sugar
Here’s everything you’ll need to make this magic happen – and I promise, it’s all simple stuff you can find at any grocery store. I’ve learned through trial and error that quality ingredients make all the difference:
- 1 lb fresh green beans, trimmed (none of those sad, limp ones!)
- 1 cup mushrooms, sliced thin (I like cremini for extra flavor)
- 1/2 cup onion, diced small (yellow onions work best here)
- 2 cloves garlic, minced (fresh is mandatory – no powder!)
- 1 cup unsweetened almond milk (the vanilla kind adds nice depth)
- 1 tbsp cornstarch (this is our thickening secret weapon)
- 1 tsp stevia powder (start with this, then taste – brands vary)
- 1/2 tsp salt (I use pink Himalayan)
- 1/4 tsp black pepper (freshly cracked if you’ve got it)
- 1/2 cup crispy fried onions (optional but OH so worth it)
Pro tip: Measure everything before you start cooking – trust me, it saves so much frantic searching later when your hands are covered in sauce!
Equipment You’ll Need
Don’t worry – you won’t need any fancy gadgets for this recipe! Just grab these kitchen basics:
- 8×8 baking dish (or any similar sized oven-safe dish)
- Medium saucepan for that creamy sauce
- Whisk to blend everything smooth
- Vegetable steamer (or a pot with lid and colander)
- Cutting board & sharp knife – because fresh veggies deserve it
That’s it! Now let’s get cooking.
How to Make Stevia Green Bean Casserole No Sugar
Okay, let’s dive into the good stuff! This casserole comes together in four simple steps that even my 12-year-old niece can handle (and she’s made it twice already!). Follow along and you’ll have a perfect, sugar-free side dish in no time.
Step 1: Prep the Green Beans
First things first – give those green beans some love! I trim off the ends (don’t skip this – nobody wants to chew on those tough stems) and cut them into bite-sized pieces if they’re super long. Then into the steamer they go for exactly 5 minutes – set your timer! We want them bright green and crisp-tender, not mushy. Drain them well and set aside. Pro tip: I spread them on a clean kitchen towel to soak up extra moisture while I prep everything else.
Step 2: Sauté the Aromatics
Now for the flavor builders! Heat a splash of olive oil in your saucepan over medium heat and toss in those diced onions. Let them get just slightly translucent – about 3 minutes – then add the mushrooms and garlic. Oh, that smell! Cook until everything’s soft and golden, stirring occasionally. This is where all that umami magic happens, so don’t rush it. When your kitchen smells like heaven, you’re ready for the next step.
Step 3: Make the Sauce
Here’s the game-changing part! Whisk together the almond milk, cornstarch, stevia, salt and pepper right in your measuring cup – no extra bowl needed. Pour it into the pan with your sautéed veggies and keep whisking like your life depends on it. Within 2-3 minutes, you’ll see it transform from milky liquid to luscious, velvety sauce. If it seems too thick, add a splash more almond milk. Too thin? Let it bubble another minute. Taste and adjust stevia if needed – brands vary wildly!
Step 4: Assemble and Bake
Time to bring it all together! Gently fold those beautiful green beans into the sauce until they’re all coated. Transfer to your baking dish and top with those crispy onions (be generous – they shrink!). Pop it in your preheated 350°F oven for 20 minutes, just until bubbly at the edges. Resist opening the oven door – the sizzle tells you it’s working! When those onions turn golden brown, you’re done. Let it sit 5 minutes before serving – I know it’s hard to wait, but this keeps the sauce from running everywhere.
Tips for the Best Stevia Green Bean Casserole No Sugar
After making this casserole dozens of times, I’ve picked up some tricks that take it from good to “can I get the recipe?” levels of amazing:
- Taste as you go – stevia brands vary, so adjust that last 1/4 tsp carefully
- Fresh beans only – frozen ones turn to mush, and canned? No way!
- Double the crispy onions – sprinkle half before baking, the rest right after for MAX crunch
- Make ahead magic – assemble everything but the onions, refrigerate, then bake with fresh topping when needed
- Roast your mushrooms for deeper flavor if you’ve got an extra 10 minutes
Follow these and you’ll have everyone begging for seconds – sugar-free never tasted so good!
Ingredient Substitutions
Look, I get it – sometimes you’re staring into your fridge or pantry thinking “I don’t have THAT!” Don’t panic! This casserole is surprisingly flexible. Here are my tried-and-true swaps that keep the magic alive:
Milk Alternatives
Out of almond milk? Been there! Any unsweetened plant milk works beautifully – coconut milk makes it extra rich (just shake the can well first). Regular dairy milk is fine too if you’re not vegan – I’ve used 2% with perfect results.
Thickener Tricks
No cornstarch? No problem! Try these:
- Xanthan gum – just 1/4 tsp does the job (but whisk like crazy!)
- Arrowroot powder – same amount as cornstarch
- Tapioca flour – gives a slightly glossy finish
Pro tip: Avoid regular flour unless you double the amount – it doesn’t thicken as powerfully.
Allium Adjustments
Not an onion fan? Try these flavor boosts:
- Leeks – milder, sweeter vibe (use white parts only)
- Shallots – fancy restaurant taste on a budget
- Garlic powder in a pinch – but fresh is always better
Green Bean Game Changers
In a real bind? Frozen green beans can work – just thaw completely and pat DRY. Or try:
- Haricots verts for a French twist
- Asparagus (cut into 1-inch pieces) for spring vibes
The moral? This recipe forgives almost any swap – except the stevia! That’s the one ingredient I wouldn’t substitute if you want truly sugar-free results. But everything else? Play with what you’ve got!
Serving Suggestions
This casserole plays well with almost any main dish! I love it alongside roasted turkey during the holidays or grilled chicken for weeknight dinners. For holidays, try it with my sugar-free glazed ham – the sweet and savory combo is unreal. Leftovers (if you have any!) make an amazing next-day lunch with a fried egg on top.
Storage and Reheating
Here’s the good news – this casserole keeps beautifully! I always make extra because it somehow tastes even better the next day. Let it cool completely (I know, the temptation is real), then cover tightly with foil or transfer to an airtight container. It’ll stay fresh in the fridge for 3 days – any longer and those green beans start getting sad.
Now, about reheating – and this is crucial – skip the microwave unless you want soggy onions (trust me, I learned the hard way). Instead, pop it back in a 350°F oven for about 15 minutes until heated through. If those crispy onions lost their crunch, sprinkle on a fresh handful before serving. My little trick? I sometimes broil it for the last minute to get that golden-brown magic back.
Freezing? I don’t recommend it for this recipe – the sauce can separate when thawed, and those beautiful green beans turn into a texture tragedy. But if you must, freeze before baking (no onion topping!), then thaw overnight in the fridge before baking as usual. Even better – just make a fresh batch! It comes together so fast anyway.
Nutritional Information
Let’s talk numbers – but first, a quick heads up! These values are estimates based on my kitchen scale and standard ingredients. Your exact numbers might dance around these figures depending on brands and how generous you are with those crispy onions (no judgment here!).
For one serving (about a hearty scoop – you know, that perfect bite with beans, sauce AND crispy bits):
- 120 calories – way lighter than traditional versions!
- 15g carbs – mostly from those nutrient-packed green beans
- 4g fiber – thanks to all those fresh veggies doing good work
- 3g natural sugars – just from the vegetables themselves
- 5g fat – and only 1g saturated if you skip the fried onions
- 4g protein – bonus plant power from the mushrooms and almond milk
What makes me happiest? Seeing that big fat 0g next to added sugars. That’s the stevia magic at work! For my diabetic friends, this usually comes out to about 11g net carbs per serving – a total win for holiday meals when you’re managing blood sugar.
Remember, nutrition isn’t just numbers – it’s about feeling good after eating too. And this casserole? It leaves me satisfied without that heavy, sugar-crash feeling. Now that’s what I call healthy comfort food!
Frequently Asked Questions
I’ve gotten so many questions about this recipe since I started sharing it – here are the ones that pop up most often. Hopefully these answers help you avoid any kitchen mishaps!
Can I use frozen green beans instead of fresh?
Oh honey, I’ve tried – and while fresh is always best, frozen can work in a pinch! Just thaw them completely and pat them bone-dry with paper towels before adding to the sauce. They’ll be a tad softer than fresh, but still delicious. Whatever you do, don’t use canned – they turn to absolute mush and make the whole casserole sad.
Does the stevia make it taste bitter?
Great question! Stevia can get bitter if you use too much – that’s why I always say “start with 1 tsp and taste.” The mushrooms and onions balance it beautifully though. Pro tip: If your stevia does taste bitter, add a tiny pinch of salt to the sauce – it magically smooths out the flavor. I use a powdered stevia blend (look for ones with erythritol) which tends to be milder.
Can I make this ahead of time?
Absolutely! Here’s my make-ahead secret: Prep everything through step 3 (sauce and beans mixed together), then cover and refrigerate for up to 24 hours. When ready to bake, let it sit at room temp while the oven preheats, add fresh crispy onions, and bake as directed – you might need an extra 5 minutes since it’s starting cold. The sauce actually thickens more as it chills – bonus!
What if I don’t like mushrooms?
No worries! I’ve made versions with diced zucchini, yellow squash, or even extra onions when my mushroom-hating nephew visits. The sauce still turns out creamy and flavorful. For extra umami without mushrooms, try adding a splash of coconut aminos or a pinch of smoked paprika. The casserole police won’t come after you – promise!
Why did my sauce turn out lumpy?
Been there! The key is to whisk the cornstarch into cold almond milk before heating – adding it directly to hot liquid makes instant lumps. If you end up with lumps anyway, don’t panic! Just blend the sauce with an immersion blender quick (or pour it through a fine mesh strainer in extreme cases). Next time, remember: cold milk + whisk like crazy = smooth sauce every time.
Got more questions? Drop them in the comments – I love helping troubleshoot! After making this casserole probably 50+ times, I’ve seen (and fixed) almost every possible kitchen hiccup.
Share Your Feedback
Nothing makes me happier than seeing your versions of this Stevia Green Bean Casserole No Sugar! Did your family go back for thirds? Maybe you added your own twist with extra garlic or different veggies? I want to hear all about it! Leave a star rating below if you tried it – those little gold stars seriously make my day. And if you snap a photo (especially if you caught that perfect crispy onion topping!), tag me on Instagram @SugarFreeKitchenMagic. Seeing your creations keeps me inspired to develop more diabetic-friendly recipes we can all enjoy. Happy cooking, friends!
Print
Stevia Green Bean Casserole No Sugar: A 40-Minute Game-Changer
- Total Time: 40 mins
- Yield: 4 servings 1x
- Diet: Diabetic
Description
A healthy twist on the classic green bean casserole, sweetened naturally with stevia and free from added sugar.
Ingredients
- 1 lb fresh green beans, trimmed
- 1 cup mushrooms, sliced
- 1/2 cup onion, diced
- 2 cloves garlic, minced
- 1 cup unsweetened almond milk
- 1 tbsp cornstarch
- 1 tsp stevia powder
- 1/2 tsp salt
- 1/4 tsp black pepper
- 1/2 cup crispy fried onions (optional)
Instructions
- Preheat oven to 350°F (175°C).
- Steam green beans for 5 minutes, then drain.
- Sauté mushrooms, onion, and garlic in a pan until soft.
- Whisk almond milk, cornstarch, stevia, salt, and pepper in a bowl.
- Pour milk mixture into the pan with mushrooms and cook until thickened.
- Mix green beans with the sauce and transfer to a baking dish.
- Top with crispy fried onions if desired.
- Bake for 20 minutes until bubbly.
Notes
- Use fresh green beans for best texture.
- Adjust stevia to taste.
- For extra crunch, add more fried onions before serving.
- Prep Time: 15 mins
- Cook Time: 25 mins
- Category: Side Dish
- Method: Baking
- Cuisine: American
Nutrition
- Serving Size: 1/4 recipe
- Calories: 120
- Sugar: 3g
- Sodium: 300mg
- Fat: 5g
- Saturated Fat: 1g
- Unsaturated Fat: 3g
- Trans Fat: 0g
- Carbohydrates: 15g
- Fiber: 4g
- Protein: 4g
- Cholesterol: 0mg