Skip to content
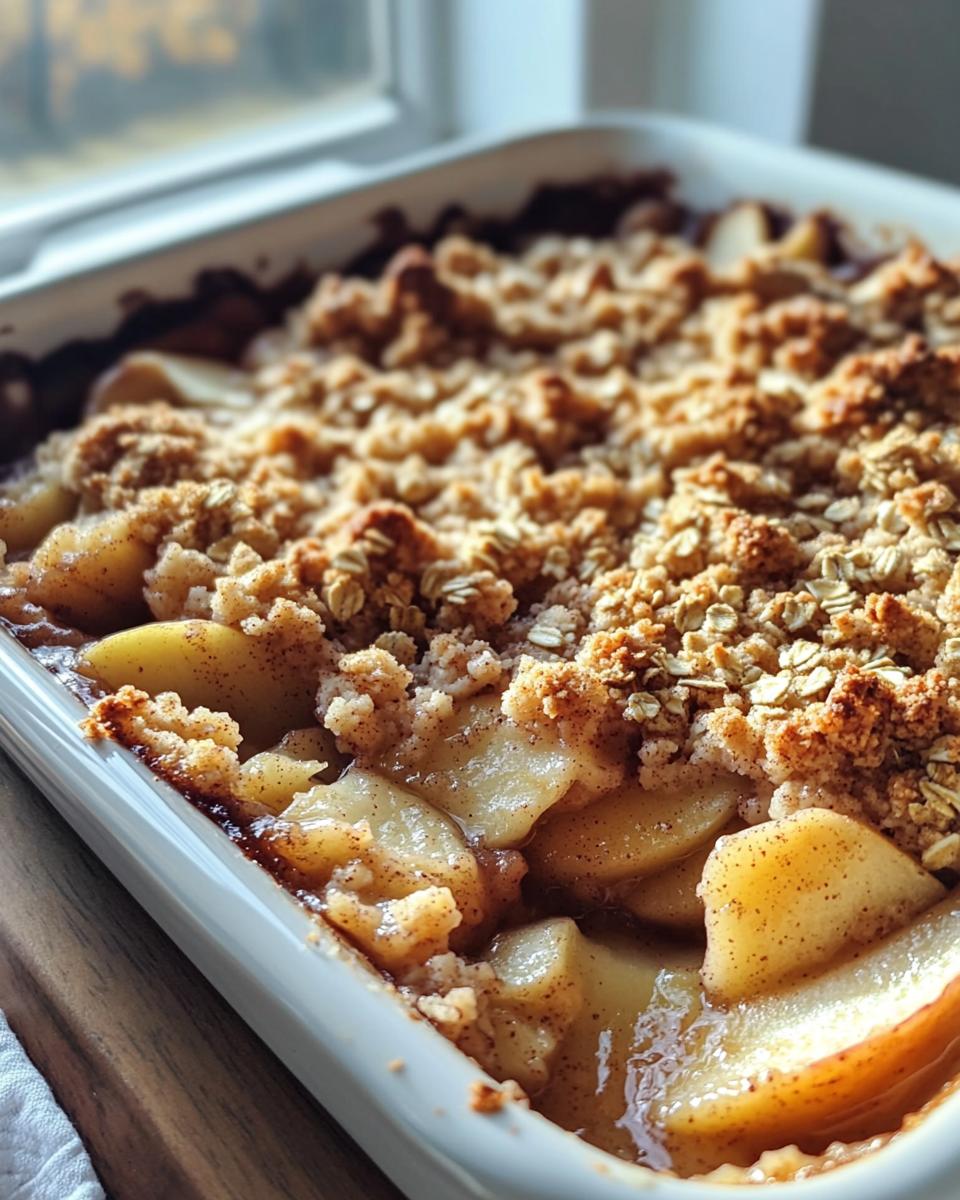
You know that moment when you’re craving something sweet but don’t want the sugar crash afterwards? That’s exactly why I created this Healthy Sugar Free Apple Crumble! I remember the first time I made it for my niece’s birthday party – no one could believe something so delicious had zero added sugar. The natural sweetness from the apples mixed with that warm cinnamon and oat topping? Absolute magic. It’s become my go-to dessert when I want to indulge without guilt, and trust me, even the pickiest eaters in my family keep asking for seconds.
Why You’ll Love This Healthy Sugar Free Apple Crumble
This isn’t just another dessert—it’s a game-changer. Here’s why:
- Quick & easy: Throw it together in 10 minutes flat—perfect for last-minute cravings!
- Naturally sweet: Ripe apples do all the work (no sugar headaches, promise).
- Guilt-free: Under 200 calories per serving? Yes, please!
- Crunchy magic: That oat-almond topping? It’s like edible confetti—but way tastier.
Seriously, it’s dessert that loves you back.
Ingredients for Healthy Sugar Free Apple Crumble
Here’s the beautiful simplicity of this recipe – just six pantry staples transform into something magical. I’ve made this enough times to know exactly what works (and had my share of “oops” moments when I didn’t measure properly). These are my tried-and-true quantities:
- 4 medium apples – peeled, cored, and sliced about 1/4″ thick (I use Granny Smith for tartness, but Honeycrisp work too)
- 1 cup rolled oats – not quick oats! The old-fashioned kind give that perfect crunch
- 1/2 cup almond flour – spoon it into the measuring cup, then level it off (packed just right)
- 1 teaspoon cinnamon – use the good stuff! I’m obsessed with Vietnamese cinnamon for extra warmth
- 2 tablespoons coconut oil – melted but not hot (that one took me a few tries to get right)
- 1 teaspoon vanilla extract – the real deal, none of that imitation stuff
Pro tip from my many kitchen experiments: measure the coconut oil after melting it. I once dumped in 2 tbsp of solid oil and ended up with a topping that wouldn’t crumble – lesson learned the hard way!
Equipment You’ll Need
One of the best things about this recipe? You probably already have everything in your kitchen right now! Here’s what I grab when I’m making my Healthy Sugar Free Apple Crumble:
- 8×8 inch baking dish – my trusty ceramic one has seen more crumbles than I can count
- Mixing bowl – medium-sized, nothing fancy (I use the same chipped one my mom gave me years ago)
- Measuring cups and spoons – because eyeballing coconut oil never works out for me
- Peeler and paring knife – for those apples (though sometimes I cheat and use my apple slicer when I’m feeling lazy)
- Fork or pastry cutter – to mix that crumble topping to perfection
That’s it! No special gadgets required – just good old-fashioned kitchen basics. Though I will say, if you’re making this often like I do, investing in a good ceramic baking dish makes all the difference for even baking.
How to Make Healthy Sugar Free Apple Crumble
Okay, here’s where the magic happens! I’ve made this recipe so many times I could probably do it in my sleep (and honestly, I’ve come pretty close after those late-night dessert cravings). Follow these steps, and you’ll have the most delicious, guilt-free apple crumble ready in no time.
Preparing the Apples
First things first – those apples! I like to get them prepped while my oven’s heating up to 350°F (175°C). Peel them if you want (I usually do for a smoother texture), then slice them about 1/4 inch thick. Too thin and they’ll turn to mush; too thick and they won’t soften properly.
Now for the fun part – toss those apple slices with the cinnamon and vanilla extract right in your baking dish. I use my hands for this (washed, of course!) because I love how the vanilla makes everything smell amazing. The cinnamon will stick to the apples beautifully, giving every bite that warm, cozy flavor.
Making the Crumble Topping
This is where the crunch comes in! In your mixing bowl, combine the rolled oats, almond flour, and melted coconut oil. Here’s my secret – I use a fork to mix it all together until it looks like wet sand. You want it crumbly, not pasty!
If the mixture seems too dry, add just a tiny bit more coconut oil (like 1/2 teaspoon at a time). Too wet? Sprinkle in a bit more almond flour. I’ve learned that perfect crumble texture is somewhere between beach sand and cookie dough crumbs.
Baking Tips
Now sprinkle that gorgeous oat mixture evenly over your apples – no need to press it down! Pop it in the oven and set your timer for 25 minutes. But here’s what I look for:
- The topping should be golden brown – not pale, not burnt
- You’ll see little bubbles around the edges where the apples are releasing their juices
- Your kitchen will smell like heaven (seriously, my neighbors always know when I’m baking this)
If after 25 minutes it’s not quite there, give it another 5 minutes. But don’t walk away – that topping can go from perfect to overdone faster than you can say “apple crumble”!
Tips for Perfect Healthy Sugar Free Apple Crumble
After making this recipe more times than I can count (and yes, burning a batch or two along the way), I’ve learned all the tricks for apple crumble perfection. Here’s what makes the difference between “good” and “oh-my-goodness-I-need-this-every-day” amazing:
Choosing the right apples
Not all apples are created equal when it comes to baking! My absolute favorite for this crumble are Granny Smith – their natural tartness balances beautifully with the sweet topping. If you prefer something a bit sweeter, Honeycrisp or Pink Lady work great too. Just avoid super soft varieties like Red Delicious – they turn to mush faster than you can say “crumble.”
Cinnamon is your best friend (but don’t overdo it!)
That warm spice flavor? It’s everything. I use about 1 teaspoon in the apples and another pinch in the topping mixture. But here’s my secret – taste an apple slice after tossing! Some cinnamon brands are stronger than others. If it needs more, add just 1/4 teaspoon at a time. You want the apples to sing with flavor, not shout.
The golden rule of crumble topping
Less is more when mixing! I learned this the hard way when I overmixed my first batch and ended up with what my brother called “apple concrete.” Just mix until the coconut oil coats everything evenly – it should look like wet sand with some loose bits. Those irregular clumps are what give you those perfect crispy-crunchy bits in every bite.
One last pro tip: let it rest for 5 minutes after baking. I know it’s tempting to dive right in (trust me, I’ve burned my tongue more than once), but those few minutes let the juices thicken up just right. Your patience will be rewarded with the most incredible texture!
Variations and Substitutions
One of my favorite things about this recipe? How easily you can make it your own! Over the years, I’ve played with so many versions – some intentional, some born from “oops, I’m out of this ingredient” moments. Here are my absolute favorite twists that still keep it deliciously healthy:
Nut-free? No problem!
That almond flour does wonders for texture, but if allergies are a concern, sunflower seed flour works beautifully as a 1:1 swap. The first time I tried this for my nephew’s school potluck, no one even noticed the difference! Regular whole wheat flour works too, though you might need an extra tablespoon of coconut oil to balance the dryness.
Berry happy accidents
One summer when I was short on apples, I threw in a handful of frozen blueberries – and wow! The burst of tart berries with the cinnamon-spiced topping became an instant favorite. Now I regularly mix in 1/2 cup of whatever berries I have (raspberries, blackberries, even diced strawberries) for a fun twist. Just toss them in with the apples – no need to thaw frozen berries first.
Spice it up (or down)
While cinnamon is classic, sometimes I swap in pumpkin pie spice for a fall vibe, or add a pinch of cardamom for something more exotic. For my dad who’s not big on spice, I reduce the cinnamon to 1/2 teaspoon and add 1/4 teaspoon of vanilla bean powder instead – the flavor is subtle but special.
Oil options
Out of coconut oil? Melted butter (regular or plant-based) works in a pinch, though it changes the flavor profile slightly. I once used avocado oil when I was desperate – not my favorite, but in a crunch, it got the job done! Just keep that same 2 tablespoon measurement.
The beauty of this recipe is how forgiving it is. My golden rule? Keep the ratios roughly the same (about 4 cups fruit to 1.5 cups dry topping) and you can’t go too wrong. Some of my best versions came from happy accidents – like that time I added chopped pecans to the topping or mixed in a teaspoon of orange zest with the apples. Don’t be afraid to play around!
Serving Suggestions
Okay, here’s the best part – how to serve this beauty! I’ve served this crumble every which way over the years, and these are my absolute favorite pairings that take it from “yum” to “where has this been all my life?” status:
Breakfast or dessert? Why not both!
The first time I ate this for breakfast topped with Greek yogurt, it was life-changing. The tangy yogurt cuts through the sweetness perfectly. My go-to is a big dollop of plain Greek yogurt (the 2% kind has just enough richness) with an extra sprinkle of cinnamon. For vegan friends, coconut yogurt works wonders too!
Whipped coconut cream – my secret weapon
When I want to feel fancy, I whip up some coconut cream. Just refrigerate a can of full-fat coconut milk overnight, scoop out the thick part, and whip it with a dash of vanilla. It’s like clouds of deliciousness melting into the warm crumble. Pro tip: Add a tiny pinch of salt to balance the flavors – it makes all the difference!
Ice cream lovers, I’ve got you
Listen, I know this is supposed to be healthy, but sometimes you just need that warm-cold contrast. A small scoop of vanilla bean ice cream (or dairy-free for my vegan pals) on top of warm crumble is pure magic. The ice cream slowly melts into all those nooks and crannies – it’s worth every single calorie.
Keep it simple
Some days, I skip the toppings altogether! The crumble is delicious all on its own with just the baked apples peeking through that crispy oat topping. My husband likes his with a glass of cold almond milk on the side – perfect for dunking those extra-crunchy bits.
No matter how you serve it, I always recommend eating it warm (or at least room temp). The flavors really pop when it’s not fridge-cold. And if you’re serving to guests? Bring the whole baking dish to the table with a big spoon – that rustic, just-baked look always gets oohs and aahs!
Storing and Reheating
Here’s the beautiful thing about this crumble – it’s just as good leftover as it is fresh from the oven! I’ve become somewhat of an expert on storing it after my weekly “must have crumble” habit. Just follow these simple tips, and you’ll have delicious dessert ready whenever the craving hits.
Fridge storage – your 3-day safety net
Let the crumble cool completely first – I learned this the hard way when I once put a warm crumble in the fridge and ended up with soggy topping (such sadness!). Cover it tightly with foil or transfer to an airtight container. Properly stored, it stays perfect for up to 3 days.
The magic of reheating
When you’re ready for round two (or three!), I’ve got two foolproof methods:
- Oven method: My personal favorite! Preheat to 300°F (150°C), uncover the crumble, and bake for about 10 minutes. This brings back that fresh-baked crispiness to the topping.
- Air fryer hack: For single servings, 2-3 minutes at 320°F (160°C) works wonders – just enough to warm it through without overcooking.
A word about microwaving (I beg you!)
I know it’s tempting – believe me, I’ve been there at midnight staring at that crumble in the fridge. But microwaving will turn your perfect crunchy topping into mush! If you must microwave, do it gently – 15 second bursts at 50% power, and only until just warm.
Can you freeze it?
Absolutely! Freeze individual portions in airtight containers for up to 2 months. Thaw overnight in the fridge, then reheat using the oven method above. The texture isn’t quite as perfect as fresh, but it’s still darn delicious when you need a quick healthy dessert fix!
Pro tip from my freezer experiments: Leave off any yogurt or cream toppings until after reheating. Frozen dairy toppings tend to separate and get weird textures – another lesson learned the hard way!
Nutritional Information
Now, I’m no nutritionist (though I play one in my kitchen!), but here’s the breakdown for my Healthy Sugar Free Apple Crumble. Keep in mind these are estimates – your exact numbers might dance around a bit depending on your apple size or how generous you are with that coconut oil!
- Serving Size: About 1/4 of the crumble (who am I kidding, I usually eat half!)
- Calories: Around 180 per serving
- Total Fat: 8g (mostly the good kind from almonds and coconut)
- Carbs: 25g (with 4g fiber from those fabulous apples and oats)
- Protein: 3g (not bad for dessert!)
- Sugar: Just 12g – all natural from the apples, baby!
Here’s my nutrition philosophy with this recipe: those numbers look great on paper, but what really matters is how amazing you’ll feel eating it. No sugar crashes, no bloating – just happy tastebuds and a satisfied belly. My friend’s diabetic husband can even enjoy a serving without worrying about his blood sugar spiking!
Remember: These values can change if you swap ingredients (like using butter instead of coconut oil) or adjust portion sizes. But honestly? I stopped obsessing over numbers years ago – when food is this wholesome and delicious, the benefits speak for themselves!
FAQs About Healthy Sugar Free Apple Crumble
Over the years, I’ve gotten so many questions about this recipe from friends, family, and even random neighbors who caught a whiff of it baking! Here are the answers to everything you might be wondering before making your own batch:
Can I use frozen apples instead of fresh?
Absolutely! I keep frozen apple slices in my freezer for crumble emergencies. No need to thaw – just toss them frozen with the cinnamon and vanilla (you might need an extra 5 minutes baking time). The texture will be slightly softer, but the flavor is still amazing. Just pat them dry first if they’re icy!
Is the coconut oil replaceable?
Yes, but choose wisely! Melted butter (regular or vegan) works beautifully as a 1:1 swap. I’ve also had success with avocado oil, though the flavor changes slightly. Whatever you do, don’t use olive oil – trust me, that was one experiment I regretted immediately!
Why did my crumble topping turn out soggy?
Oh honey, I’ve been there! Usually it’s one of three things: 1) You didn’t let the melted coconut oil cool before mixing, 2) The apples were extra juicy (try patting them dry next time), or 3) You covered it while still hot (steam is the enemy of crunch!). The fix? Pop it back in the oven uncovered for 5-10 minutes.
Can I make this recipe nut-free?
You sure can! Swap the almond flour for sunflower seed flour (equal amounts) or even oat flour. Just know the texture will be slightly different – more tender than crunchy. My nephew’s nut-allergic friends gobble up the sunflower seed version every time!
How do I know when the apples are cooked through?
Give them a gentle poke with a fork after baking – they should yield easily but not be mushy. If they’re still firm, cover with foil and bake another 5 minutes. The apples continue softening as the crumble cools, so err on the slightly firmer side if you’re unsure!
Ready to Bake?
Well, what are you waiting for? Your kitchen is about to smell like a cozy autumn day, even if it’s the middle of July! I can practically taste that crispy oat topping and tender cinnamon apples already. This Healthy Sugar Free Apple Crumble is honestly one of those recipes that tastes like a warm hug – and now you’ve got all my best tips to make it perfect on your first try.
I’d love to hear how your crumble turns out! Did you stick to the classic version or try one of the fun variations? Snap a photo of your masterpiece (sloppy slices and all – that’s half the charm!) and tag me. Nothing makes me happier than seeing other people fall in love with this recipe like I have. Happy baking, my friend – may your crumble be crispy, your apples perfectly spiced, and your dessert cravings thoroughly satisfied without the sugar crash!
P.S. If this becomes your new go-to dessert like it is mine, pay it forward – share the recipe with someone who needs a little more joy in their life. Good food is meant to be shared, after all!
Print
Healthy Sugar Free Apple Crumble: 4-Ingredient Bliss You’ll Crave
- Total Time: 35 mins
- Yield: 4 servings 1x
- Diet: Low Calorie
Description
A healthy apple crumble with no added sugar, perfect for a guilt-free dessert.
Ingredients
- 4 medium apples, peeled and sliced
- 1 cup rolled oats
- 1/2 cup almond flour
- 1 tsp cinnamon
- 2 tbsp coconut oil
- 1 tsp vanilla extract
Instructions
- Preheat oven to 350°F (175°C).
- Toss apples with cinnamon and vanilla extract, then place in a baking dish.
- Mix oats, almond flour, and coconut oil in a bowl until crumbly.
- Sprinkle the oat mixture over the apples.
- Bake for 25-30 minutes until golden and bubbly.
Notes
- Use tart apples for natural sweetness.
- Adjust cinnamon to taste.
- Prep Time: 10 mins
- Cook Time: 25 mins
- Category: Dessert
- Method: Baking
- Cuisine: American
Nutrition
- Serving Size: 1/4 recipe
- Calories: 180
- Sugar: 12g
- Sodium: 5mg
- Fat: 8g
- Saturated Fat: 4g
- Unsaturated Fat: 3g
- Trans Fat: 0g
- Carbohydrates: 25g
- Fiber: 4g
- Protein: 3g
- Cholesterol: 0mg