Skip to content
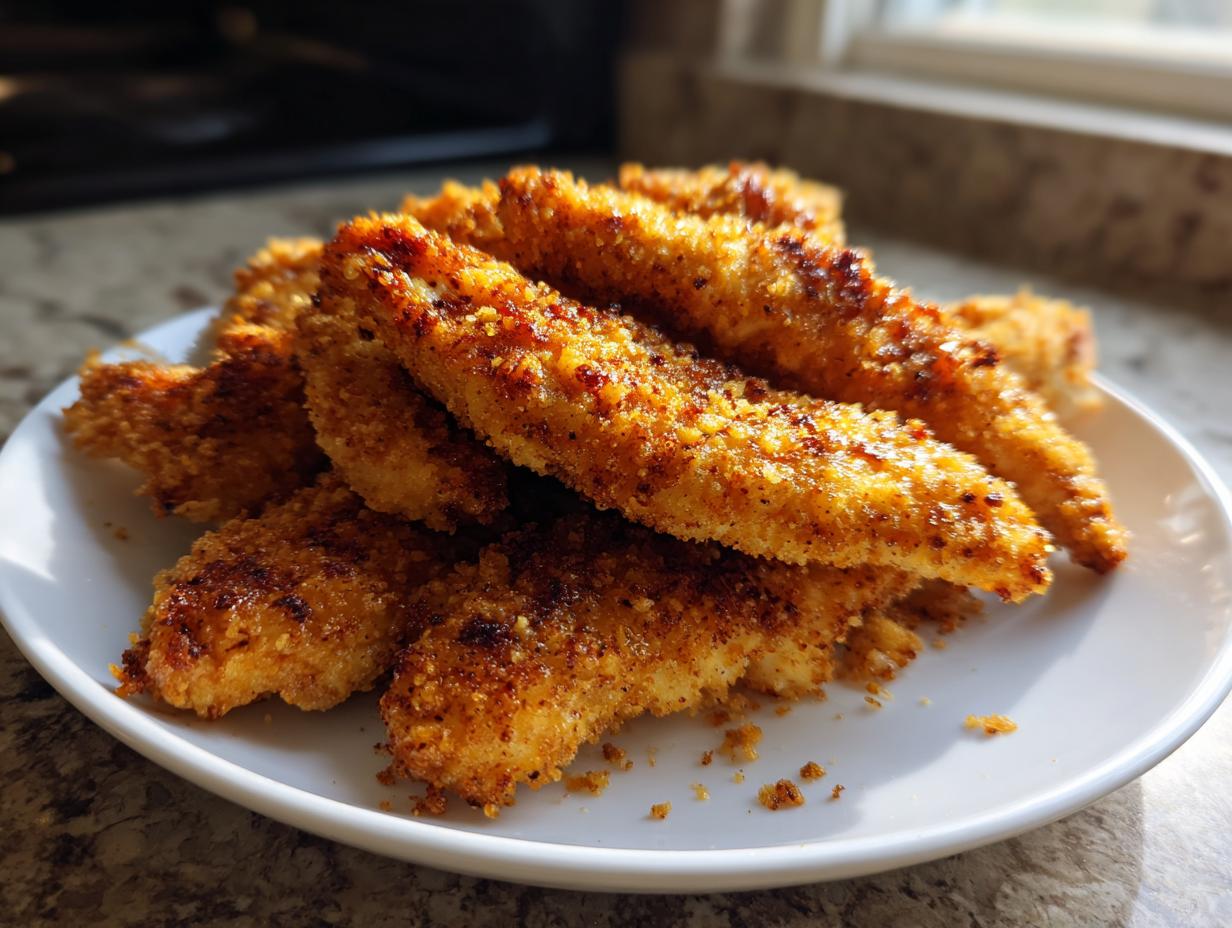
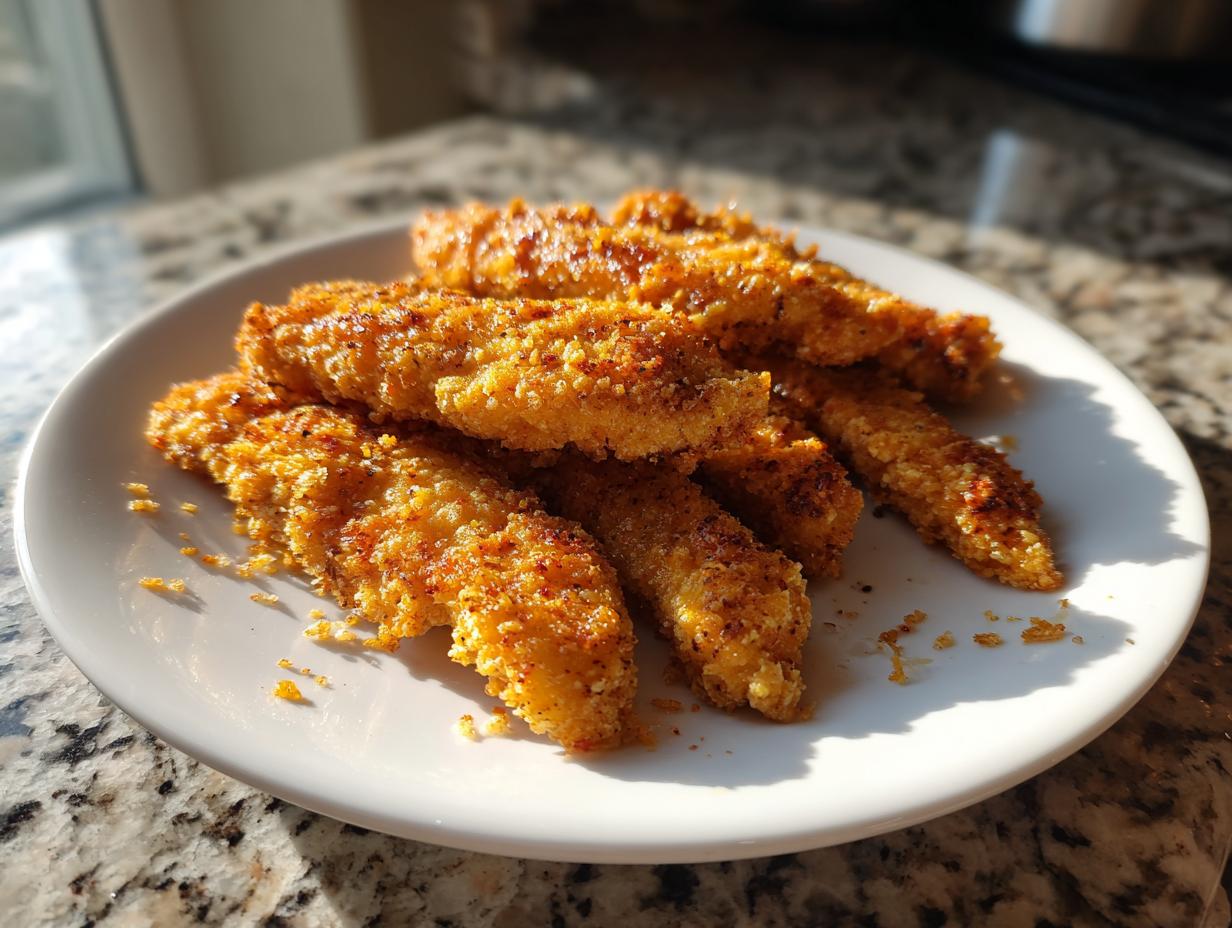
Oh, these Low Carb Crispy Baked Chicken Tenders (Almond Flour) are my absolute go-to when I’m craving something crunchy but don’t want to feel guilty afterwards! I swear, the first time I made these, my kids didn’t even notice they were eating healthy – they just kept begging for more. The magic happens when the almond flour gets all golden in the oven, creating this perfect crispy crust that you’d swear was deep-fried. What I love most is how ridiculously easy they are to throw together – we’re talking 10 minutes of prep, just some simple dipping and coating, then 25 minutes in the oven while you relax. And the best part? No breadcrumbs, no gluten, just pure delicious protein that keeps everyone happy (including your waistline).
Why You’ll Love These Low Carb Crispy Baked Chicken Tenders
Listen, I know what you’re thinking—”baked” chicken tenders can’t possibly be as good as fried. But trust me, these will change your mind! Here’s why they’re my weeknight hero:
- Crazy quick: From fridge to table in under 35 minutes—even my hangry teenager can wait that long
- No messy frying: All that crispy goodness comes from your oven, not a vat of oil (your stovetop thanks you)
- Gluten-free magic: Almond flour gives that perfect crunch without any breadcrumbs
- Protein powerhouse: 26g per serving means you’ll stay full for hours
- Kid-approved: My picky eaters gobble these up faster than chicken nuggets (shh, don’t tell them it’s healthy)
Seriously, these tenders are the ultimate “healthy but doesn’t taste healthy” win!
Ingredients for Low Carb Crispy Baked Chicken Tenders
Okay, let’s talk ingredients – and I mean the good stuff that makes these tenders so addictively crispy without all the carbs! I’ve learned the hard way that quality matters here, so don’t skimp. Here’s exactly what you’ll need, grouped so you can grab everything in one go:
The Chicken (The Star of the Show!)
- 1 lb chicken tenders (about 8-10 pieces) – or slice boneless breasts into strips if that’s what you’ve got
The Crispy Coating (Where the Magic Happens)
- 1 cup almond flour – not packed! Just spoon it lightly into your measuring cup (I like the super-fine blanched kind for extra crispiness)
- 1 tsp garlic powder – because everything’s better with garlic
- 1 tsp paprika – smoked paprika gives an awesome flavor if you have it
- 1/2 tsp salt – I use kosher salt for better distribution
- 1/4 tsp black pepper – freshly ground if you can
The Binders & Boosters
- 1 large egg – beaten well (room temperature works best)
- 1 tbsp olive oil – for that final crispy drizzle (avocado oil works great too!)
See? Nothing crazy or hard-to-find! Just simple ingredients that come together to make something magical. Pro tip: measure everything before you start – it makes the coating process so much smoother when you’re not scrambling mid-recipe.
How to Make Low Carb Crispy Baked Chicken Tenders
Okay, let’s get down to business! I swear this is easier than ordering takeout, and way more satisfying. Follow these steps and you’ll have golden, crispy chicken tenders that’ll make you forget all about the deep-fried version.
Step 1: Prep the Coating
First things first – preheat that oven to 400°F (200°C). While it’s heating up, grab two bowls – one for dry stuff, one for wet. In the first bowl, whisk together your almond flour, garlic powder, paprika, salt, and pepper until they’re totally combined. I like to give it a quick taste to make sure the seasoning’s just right (just don’t double-dip that finger!).
In the second bowl, crack your egg and beat it like it owes you money – you want it completely smooth with no streaks of white left. Set up your workstation with the chicken, egg bowl, flour mixture, and a parchment-lined baking sheet (trust me, the parchment is non-negotiable for easy cleanup).
Step 2: Coat the Chicken
Now the fun part! Take each chicken tender and give it a quick pat dry with paper towels – this helps the coating stick better. Dip it first in the egg, letting any excess drip off (too much egg makes the coating slide right off). Then roll it in the almond flour mixture, pressing lightly so the coating really adheres.
Place each coated tender on your prepared baking sheet, leaving about an inch between them – no overcrowding or they’ll steam instead of crisp up! I like to use tongs for this part to keep my fingers clean. Pro tip: work one hand “wet” (for the egg) and one “dry” (for the flour) to avoid breadcrumb fingers.
Step 3: Bake to Perfection
Once all your tenders are coated, drizzle them lightly with olive oil – this gives that gorgeous golden color. Pop them in the oven on the middle rack and set your timer for 10 minutes. When it dings, flip them carefully with tongs (this ensures even crispiness on both sides) and bake for another 10-15 minutes until they’re deeply golden and the internal temp hits 165°F.
The smell will drive you crazy by now! For extra crispiness, I sometimes broil them for the last 1-2 minutes – just watch them like a hawk so they don’t burn. Let them rest for 5 minutes before serving (the hardest part!) and prepare for the crunchiest, most satisfying low-carb chicken of your life.
Tips for the Best Low Carb Crispy Baked Chicken Tenders
After making these tenders at least a hundred times (no joke – my family won’t let me stop), I’ve picked up some tricks that take them from good to “Oh my god, how is this not fried?!” levels of amazing. Here are my can’t-live-without tips:
- Dry those tenders thoroughly! I can’t stress this enough – moisture is the enemy of crispiness. A quick pat-down with paper towels makes all the difference in getting that coating to stick perfectly.
- Bake on a wire rack if you’ve got one. Placing it over your baking sheet lets hot air circulate all around the tenders for maximum crispiness on every side. No more flipping halfway through!
- Don’t skimp on the oil drizzle. That tablespoon might seem like nothing, but it’s what gives you that gorgeous golden color and satisfying crunch. I use my hands to rub it lightly over each tender for even coverage.
- The broiler is your secret weapon. If your tenders aren’t quite as dark as you’d like after baking, 1-2 minutes under the broiler works miracles. Just stay nearby – they go from perfect to burnt frighteningly fast!
- Season as you go. I like to sprinkle a tiny bit of extra salt right after they come out of the oven when the seasoning really sticks. Sometimes I’ll add a pinch of cayenne too if we’re feeling spicy.
There you have it – my hard-won wisdom from years of chicken tender experiments. Follow these and you’ll never miss the deep fryer again!
Ingredient Substitutions & Variations
Okay, let’s talk about playing around with this recipe – because who doesn’t love options? I’ve tested just about every swap imaginable when the pantry was looking bare or when friends with different diets came over. Here’s what works (and what doesn’t) when you want to mix things up:
Flour Swaps That Actually Work
Ran out of almond flour? Been there! Coconut flour can work in a pinch, but use only 1/3 cup (it’s crazy absorbent) and add an extra egg. The texture will be slightly different – more delicate, but still delicious. For a nut-free version, try pork rind crumbs (sounds weird, tastes amazing) or crushed flaxseed meal mixed with a tablespoon of Parmesan.
Cheese Lovers’ Upgrade
If dairy’s not an issue, oh boy – mix 1/4 cup grated Parmesan right into the almond flour coating. It adds this incredible savory depth and extra crunch that’ll make you swoon. For keto folks, the Parmesan helps bump up the fat content too – win-win!
Spice It Your Way
The basic seasoning blend is just the starting point. Some of my favorite twists:
- Cajun style: Add 1/2 tsp cayenne + 1/2 tsp onion powder + 1/4 tsp thyme
- Italian vibes: Swap paprika for 1 tsp dried oregano + 1/2 tsp basil
- Everything Bagel: Mix in 1 tbsp Everything Bagel seasoning (trust me on this one)
Dietary Tweaks
For egg-free, a flax egg (1 tbsp ground flax + 3 tbsp water) works okay, but the coating won’t stick quite as well. Dairy-free? Just skip the Parmesan suggestion – the tenders are naturally dairy-free as written. Whole30 folks – make sure your almond flour is compliant (no skins) and skip any cheese additions.
The beauty of this recipe? It’s forgiving! As long as you keep the basic ratio of 1 lb chicken to about 1 cup coating, you can get creative with flavors. My rule? Write down what you try – you’ll want to remember the winners (and the fails you shouldn’t repeat)!
Serving Suggestions for Low Carb Crispy Baked Chicken Tenders
Now that you’ve got these gorgeous golden tenders fresh from the oven, let’s talk about how to serve them up right! I’ve had so much fun playing with different combinations over the years – here are my absolute favorite ways to enjoy them:
Dipping Sauces That’ll Make You Weak in the Knees
Oh, the dipping possibilities! My kids go crazy for these options:
- Cool & Creamy Ranch: Mix sour cream with dried dill, garlic powder, and a splash of lemon juice
- Smoky BBQ: Sugar-free ketchup + smoked paprika + a dash of liquid smoke
- Spicy Mayo: Mayo with sriracha and lime zest (my personal weakness)
- Avocado Lime: Mashed avocado with Greek yogurt and lime juice
Low-Carb Sides That Complete the Meal
These tenders pair perfectly with:
- Roasted Brussels sprouts with crispy bacon bits (trust me, it’s magic)
- Zucchini fries baked with the same almond flour coating
- Crisp cucumber salad with apple cider vinegar dressing
- Cauliflower mash when you’re craving comfort food
For packed lunches, I’ll often throw a few cold tenders over a big salad with ranch dressing – the almond flour coating stays surprisingly crisp! And if you’re feeling fancy, slice them up for the most amazing low-carb chicken Caesar wrap using lettuce leaves instead of tortillas.
Really, the options are endless – which is why this recipe stays in my weekly rotation. What will you pair yours with?
Storage and Reheating
Okay, let’s talk about keeping these beauties crispy for days – because let’s be real, you might want to make extra just for leftovers! Here’s exactly how I store and reheat these tenders so they taste just as amazing as when they first came out of the oven.
Storing Those Precious Tenders
First rule: let them cool completely before storing – no one wants soggy chicken! I spread mine out on a plate for about 15 minutes first. Then, into an airtight container they go with a paper towel layered underneath to soak up any moisture. They’ll stay crispy-fresh in the fridge for up to 3 days this way. For longer storage, freeze them in a single layer on a baking sheet first (so they don’t stick together), then transfer to a freezer bag for up to 2 months.
Reheating Like a Pro
Microwaving is the enemy of crispiness! Instead, here’s how I bring back that perfect crunch:
- Oven method: 5-7 minutes at 375°F on a wire rack – the hot air circulation works wonders
- Air fryer magic: 3-4 minutes at 380°F – it’s like they’re fresh from the oven again!
- Toaster oven: Great for small batches – just watch closely so they don’t over-brown
Frozen tenders? No problem! Pop them straight from freezer to air fryer (no thawing needed) at 370°F for 6-8 minutes. I always give them a quick spritz of oil before reheating to revive that golden crispness. And if you’re feeling extra, a minute under the broiler at the end makes them look (and taste) brand new!
Pro tip: If you’re packing these for lunch, keep the dipping sauce separate until you’re ready to eat. That way, every bite stays gloriously crunchy!
Nutritional Information
Okay, let’s talk numbers – but don’t worry, these are the good kind! Now, I’m no nutritionist (just a chicken tender enthusiast), so take these estimates with a grain of salt. They can vary based on your exact ingredients and portion sizes. Here’s the breakdown per serving (about 4 oz of cooked chicken):
- 280 calories – way less than traditional fried tenders!
- 18g fat – the good kind from almond flour and olive oil
- 26g protein – hello, muscle fuel!
- 6g net carbs (total carbs minus fiber) – perfect for low-carb lifestyles
- 3g fiber – thanks to that almond flour goodness
- 1g sugar – naturally occurring, nothing added
A quick heads up – if you add Parmesan or use different dipping sauces, those numbers will change. I like to think of these tenders as a nutritional win – all that protein keeps you full for hours, while the low carb count means no afternoon crash. My fitness-tracker-wearing husband calls them “macro-friendly,” whatever that means – I just call them delicious!
FAQs About Low Carb Crispy Baked Chicken Tenders
I get asked about these tenders ALL the time – here are the questions that pop up most often in my kitchen (and my honest answers from years of trial and error!):
Can I use chicken breasts instead of tenders?
Absolutely! Just slice boneless breasts into 1-inch strips. They might need 2-3 extra minutes in the oven since they’re thicker. I actually do this half the time when tenders are pricey!
How do I keep them from getting soggy?
Three secrets: 1) Pat chicken DRY before coating, 2) Don’t overcrowd the pan, and 3) Let them cool on a wire rack instead of piling them up. Works every time!
Is almond flour really necessary?
It gives the best crunch, but in a pinch, try crushed pork rinds or coconut flour (use 1/3 cup). The texture changes slightly, but still delicious!
Can I make these ahead of time?
You bet! Prep the coated tenders and refrigerate (unbaked) for up to 4 hours. Add 1-2 minutes to baking time since they’re cold. Perfect for meal prep Sundays!
Why aren’t mine as crispy as yours?
Two likely culprits: 1) Not enough oil drizzle before baking, or 2) Skipping the flip halfway through. Also – try broiling that last minute for extra crunch!
For more low-carb recipe ideas, check out No Sugar Recipes on Pinterest.
Print
26g Protein Low Carb Crispy Baked Chicken Tenders You’ll Crave
- Total Time: 35 minutes
- Yield: 4 servings 1x
- Diet: Low Carb
Description
Crispy baked chicken tenders made with almond flour for a low-carb option.
Ingredients
- 1 lb chicken tenders
- 1 cup almond flour
- 1 tsp garlic powder
- 1 tsp paprika
- 1/2 tsp salt
- 1/4 tsp black pepper
- 1 egg
- 1 tbsp olive oil
Instructions
- Preheat oven to 400°F (200°C).
- Mix almond flour, garlic powder, paprika, salt, and pepper in a bowl.
- Beat the egg in another bowl.
- Dip each chicken tender in the egg, then coat with the almond flour mixture.
- Place tenders on a baking sheet lined with parchment paper.
- Drizzle with olive oil.
- Bake for 20-25 minutes until golden and crispy.
- Serve hot.
Notes
- Store leftovers in an airtight container for up to 3 days.
- For extra crispiness, broil for 1-2 minutes at the end.
- Prep Time: 10 minutes
- Cook Time: 25 minutes
- Category: Main Dish
- Method: Baked
- Cuisine: American
Nutrition
- Serving Size: 4 oz
- Calories: 280
- Sugar: 1g
- Sodium: 320mg
- Fat: 18g
- Saturated Fat: 2g
- Unsaturated Fat: 14g
- Trans Fat: 0g
- Carbohydrates: 6g
- Fiber: 3g
- Protein: 26g
- Cholesterol: 120mg